
In this blog post I take a closer look at the software and engineering skills professional voice overs use in post-production (or “post”).
Digital Audio Workstations (DAWs) for Voice Overs
As a voice over I record and edit digital audio on a daily basis and the main tool that I use is called a Digital Audio Workstation (DAW) — a piece of computer software designed to process voice, music and, generally, any type of recorded sound.
There are many DAWs available (in this article I’ll discuss Pro Tools, Adobe Audition, Ableton Live, Wavelab Pro 11 and Audacity). Within each DAW there are specific tools or features that are useful for voice over post-production.
In this article, I’ll cover each useful tool (software feature) under it’s own heading. Then, later in the article, I’ve included a table that summarises which of these tools are present in the most popular DAWs, so you can make a comparison and select the best DAW for your needs.
Let’s get started!
Audio Tools Used by Voice Overs
Editing Tools: Keyboard and Mouse Shortcuts
This first category is all about editing audio. When pitching for gigs or completing paid voice over work, you’ll need to review your performances, possibly edit together your strongest takes, remove mistakes and breaths, and check that your performance fits into a specified amount of time (for example, radio commercial voice overs often need to be close to, but slightly less than, 30 seconds in duration).
To make the editing process faster and easier, keyboard and mouse shortcuts in your DAW give you fast access to the commands you need the most. It’s worth running a web search for the editing shortcuts your DAW offers.
Editing Tools: The Ability to Sync Audio to Video

Sometimes a client will need me to sync my voice to video, taking editing to the next level. Syncing to picture is supported by some of the top DAWs (see table below).
Editing Tools: Snap to Zero Crossings
In order to avoid any unacceptable pops and clicks in the places you edit your voice over recording, you need audio software that attenuates the audio signal so that it’s non-existent at each edit point. This is called a zero crossing. Software that supports this feature is shown in the table below.
Audio Processing
Compression
Any audio which is to be used online, on the TV, or the radio needs to have a consistent volume — one or two sections cannot be louder or quieter than the rest of the monologue. The voice over must also not sound like they’re shifting position on the microphone — moving closer or further away — unless the passage or performance intentionally requires this.
A compressor can be used to achieve this. A compressor makes a voice solid, strong, and consistent in projection throughout a recording. It achieves this by turning down the loud parts of the recording, so that the level becomes more uniform. Next, the entire uniform recording is turned up (using “Makeup Gain”), to be as bold as possible. Compression is essential when a voice over will be placed on top of a music bed.
Quiet passages (for example poetry verse), and voices that project consistently, don’t always need compression, or may only need a subtle amount — preserving a natural sound. Heavily compressed audio can quickly become fatiguing to the human ear. So compression is perfect when you’re announcing a new car, or promoting a TV show, but it can quickly become overkill, especially in recordings that have a long duration, like audio books. Treat your listeners’ ears well and use compression in a measured way!
Noise Gate / Audio Gating
Taking things a step further, let’s talk about the breath. Breaths can make or break a voice over recording, and they often need to be removed entirely, or at least attenuated (turned down) so that they don’t distract the listener from the words. When it comes to removing breaths, an audio gate will serve this purpose. Think of an audio gate like an automatic gate in a farmer’s field. The gate closes when cattle get close and stops the cattle leaving (or with a voice over recording, it stops the breaths making it onto the final recording) and the gate opens when the farmer gets close, wanting to enter or leave the field (in our case, when the voice over actor is speaking — letting the words pass through unaffected).
A gate can be a binary thing, i.e. open or closed, with no middle ground (as with the cattle in the field example), or it can be adjusted to be more subtle, slightly attenuating the breaths while letting the voice come through as intended. Pro Tools actually takes this idea a step further, and has a brilliant and time saving “Strip Silence” function.
Plugins (FX)
If you’re making promos intended to catch attention, or are recording deep, booming, film trailer voice overs, then additional effects processing (FX) is a must!
Likewise, if your recording is less than ideal — perhaps there’s a lot of sibilance on your recording, or maybe the voice sounds distant — there are FX plugins to help you fix problems like these “in the mix” (which is another way of saying “after the recording has been made”).
There are two main formats of plugin, AU (Audio Units, for Mac-based systems) and VST (the Windows version). They two types work in the same way, for example an echo plugin in AU format will do the same thing as an echo plugin in VST format. But not every DAW supports every plugin format. The plugin types supported by the different DAWs are shown in the table below.
Audio File Generation
File Format
When you choose a DAW, pay attention to which file formats it can export.
If you’re sending audio by email, it’s good to watch your file size so that the message doesn’t bounce. Up to 10MB (megabytes) should be OK, but anymore and you risk non-delivery. Mp3 is designed to have small file sizes while maintaining a high-quality sound; voice over recordings sound excellent encoded into mp3 format at 160kbps, mono (one channel of sound) and CBR (constant bit rate).
Mp3 is also useful for castings, if you don’t want to give a client the absolute best-quality recording of a script, but still want to effectively demonstrate your voice; sending a slightly lower quality file works a bit like placing a watermark on an image that hasn’t yet been paid for. This way, you can feel confident that a client will pay you to receive the highest quality file, should they cast you for their project (96kbps or 128kbps, mono, mp3 works well for good-quality, but not top-quality demos).
Lossless file formats are the most popular for professional voice over recordings, and by this I mean WAV (Waveform Audio File Format) files and AIFF (Audio Interchange File Format) files, usually recorded / encoded at a sampling rate of 44.1kHz, 48kHz, or higher, and at a bit depth of 16, 24, or 32 bit.
Here, I also want to mention the less common FLAC (Free Lossless Audio Codec) file format. FLAC is another lossless format, but it has an edge on WAV or AIFF formats because, by comparison, it generates smaller file sizes while still maintaining no loss of audio quality.
If you plan to record voice overs for telephone systems such as IVR (Interactive Voice Response), you will need the ability to encode 8kHz, 16bit, WAV files. While it is nice for your DAW to support the export of this type of file (and some do, see the table below), if it doesn’t you can always find websites that will do the conversion for you (Just feed in your original lossless recording and they will convert it into an IVR-ready file, which you can then download and share with your client. An example is https://g711.org/)
Batch Processing
If you’re planning to record a large number of prompts, and by that I mean if you’re planning to record voice overs for eLearning courses, IVR systems, video games or even audio books, then you’ll need to supply the audio split into a lot of separate files which the software can play at the appropriate time. To explain further, in the case of an eLearning course or any presentation, each slide has a different audio file that plays as the user moves through the course. Therefore, the voice over artist usually needs to supply their audio separated into files named: “slide1.wav”, “slide2.wav”, etc.
For projects like these, a client may also specify that the files need to have a silence of a specified duration inserted at the start and the end, and also that all audio files are the same volume level (loudness level). Additionally, the audio may need to be supplied in multiple file formats, or perhaps the lossless audio you recorded is too large (in megabytes, MB) for a streamed course designed for low bandwidth internet connections, and so it may all need converting into mp3. If this sounds like it might be tedious to do manually, you’re right, and you’ll be pleased to hear that some DAWs will do all of this work for you in a “batch process”. See the table below for the software that supports batch processing.
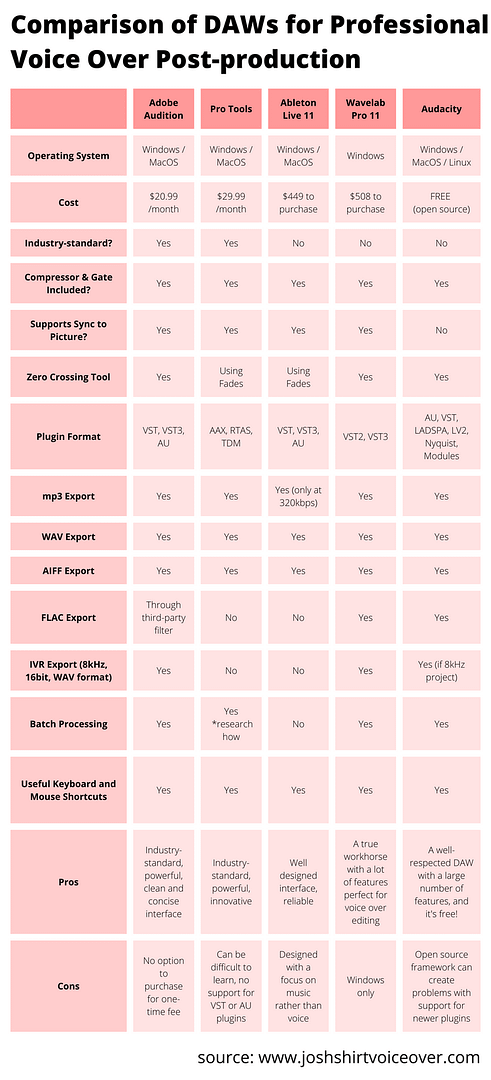
I hope this article has provided a useful behind-the-scenes look at professional voice over post- production. While almost any audio software, premium or free (open source), will allow you to get started, the industry standard DAWs for voice over editing and top quality sound are Pro Tools and Adobe Audition. Even though it’s an outsider, Ableton Live is also worth a look and is my personal software of choice. Wavelab Pro 11 and Audacity are also noteworthy, and offer a broad range of features.
About the Author
Josh Shirt is a top UK voice over artist with over 15 years of professional full-time experience. Everyday his voice is heard around the world, on TV, radio and online, and his acting work is heard in audio books and in animations and educational courses. In the commercial realm, he has lent his voice to many top brands including Microsoft, Lego, Airbnb and Samsung.